SEPARATING AUDIO FROM VIDEO
You’ve probably noticed that the audio and video for each of these clips move around together. In other words, as you move the video, the audio tracks move along with it.
Sometimes you want to have the sound from ONE clip playing underneath the VIDEO from a different clip. For example, you might want to hear Emory talking on the radio while seeing the picture of the Titanic.
-- This can be accomplished by using the padlocks assigned to each channel.
Look to the very far left of your timeline in the “Track Controls” area.
![]()
Each track has its own padlock. Right now they’re all UNlocked. Click on one of them and the entire track will appear to have diagonal lines across it.
This means that that track cannot be changed. So if you lock all of the audio tracks and then shorten or lengthen the video track (using the razor blade or just by dragging the ends with the Selection Tool), you can make the video longer or shorter than the audio that is connected to it.
Conversely, by locking the video track and extending the audio, you can make the sound longer than the picture.
-- Lock all of the video tracks and then edit, lengthen, rearrange and/or cut up the audio tracks.
-- Also notable, the padlocks will allow you to delete either JUST the audio or JUST the video from the TIMELINE without affecting the other, so you can get rid of all the sound from a clip if you’re going to use some other sound beneath it.
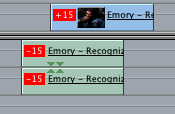
NOTE: The Audio and Video clips are linked together to preserve your sync. If you start moving them around haphazardly, you run the risk of throwing your audio and video out of sync. This is a problem when you have people speaking and suddenly their mouths aren’t moving at the same time as you’re hearing the words. If you move a section of audio out of sync from its linked video, this fact will be indicated by little red numbers that will appear on the clips in your timeline indicating how far out of sync you are.
FORWARD TO PAGE 19 – “Unlinking Audio from Video”