MAKE SURE THE DEFAULT OPTIONS ARE SET UP CORRECTLY
--- The first thing you should do when you open up FCP is to make sure that your projects and sequences are going to be set up correctly.
An easy way to do this it to utilize FCPro's "Easy Setup" menu.
Go up to the menu bar at the top of the page and click the "Final Cut Pro" menu and then go down to "Easy Setup..."
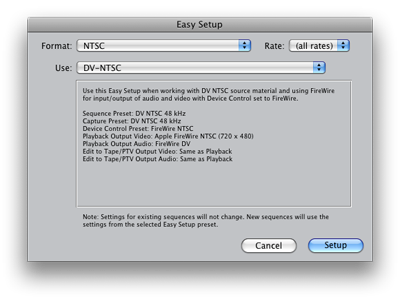
- Start with the top drop-down on the Easy Setup menu. Since you're NOT working in HD on THIS tutorial, you want to select "NTSC" from the "Format" drop down menu.
- For this first exercise you'll be working with a frame rate of 29.97fps but, for now, set the "Rate:" drop-down menu to "(all rates)". This will cause the next dropdown to display more options.
-
Finally, go to the "Use:" Dropdown menu and select "DV-NTSC"
- Click the "Setup" button
It should look like this:
Make note of where the Easy Setup is. Once you start shooting your own footage in HD, you will need to select different options. If you do not set up Final Cut Pro properly, you will have problems as you edit and/or try to finish your work.
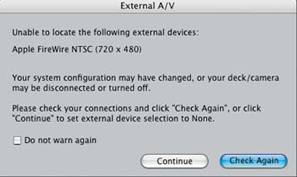
If you've changed your settings, you may now see the window that says “External A/V Unable to locate the following external devices Apple Firewire NTSC (720x480)….”
Again, this is just letting you know that FCP is not seeing the deck. If the deck is not powered on, then this is not a problem. Click "Continue"
--- The next thing you should do is to DOUBLE-CHECK YOUR SCRATCH DISCS. With the automatic setup that we have here in Mulberry, this shouldn’t be an issue and they should be already set for you. But if you’re using FCP elsewhere, it’s important that you do this every time you open up the program because this tells FCP where to save your files.
By doing this now, you’ll learn where these options are located and you can troubleshoot or set these when necessary.
-- Go up to “Final Cut Pro” on the top menu bar,
then down to “System Settings...”
Then look at first tab which is labeled “Scratch Disks”
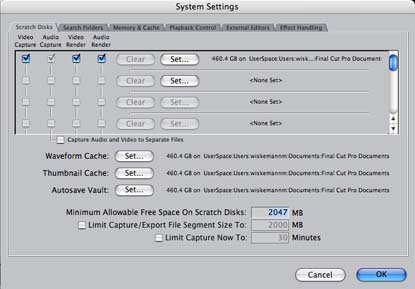
You’ll see a series of rows. Look at the top row and make sure that all of the check boxes are checked “Video Capture” “Audio Capture” “Video Render” and “Audio Render”. All of these should be automatically set to your folder on the "UserSpace" drive and should look something like this:

This means that all your personal video files will be saved in your folder.
If those are NOT set to a directory with your name on it and you're in Mulberry, there could be a problem. You do not want to save things into some other student's directory. Make sure that you are logged into the computer and you're not working from within somebody else's login. If you’re working on a NON-Mulberry computer, you may need to change these and they can be changed by clicking the “set” button. In the Mulberry lab you should NOT change them from your personal directory. If your "Capture Scratch" is set for anyting OTHER than your personal User directory, you run the risk of somebody else deleting all your footage.
Now, look at the bottom of the window where it says “Waveform Cache” “Thumbnail cache” and “Autosave Vault”. All of these should be set to your folder as well. Again, if you’re working on a non-Mulberry computer and need to change these, you can do so my clicking the “set” button

You shouldn't have to change anything in Mulberry, so you should be able to just click ‘cancel’ to close this window. If you have changed anything, you'll want to hit "OK" to save the new settings.
FORWARD TO PAGE 3 – “Setting Audio Output”