OVERWRITING & INSERTING
Overwriting and Inserting are the two basic ways of combining our video clips.
As their names indicate, OVERWRITING will REPLACE the clip that it is overlapping while INSERTING will INSERT your clip in between the other clips.
-- Go to your browser and double click on the “Rusty Titanic” clip again. In the Viewer Window, set “In” opint at the 26 second mark and and “Out” point at 28 seconds. You should now have a 2-second long section between the “In” and “Out”.
This time when you drag it down into the TIMELINE, drag it into the MIDDLE of the “Emory” clip that you have on the V2 track. BUT Don’t let go of the mouse button yet! (if you’ve already let go of the mouse button and dropped the clip, apple-z/undo and try it again.)
Again, while holding the mouse button down, drag the 2-second “Titanic” section ON TOP OF the “Emory” clip that you have on the V2 track. Do not create a new track this time, you want this clip right on top of the Emory clip on V2.
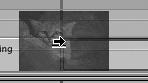
Watch how the cursor changes as you get over the video clip that’s already there. As you drag it into the V2 track, the cursor with either change into an arrow pointing to the left or an arrow pointing straight down. These arrows tell you whether you are about to perform an OVERWRITE or an INSERT edit.
If the arrow is pointing DOWN, you are about to OVERWRITE the track you're on top of. You are going to replace the PREVIOUS video and audio with the one you’re dragging down.

If it is pointing to the RIGHT, then you are about to perform an INSERT edit and the rest of the video will be shoved down the timeline, splitting open for you to drop your new video in.
-- When the arrow is pointing down, release the mouse button so you do an Overwrite edit. Hit apple-Z to undo this edit.
-- Now, drag the clip down again and do an Insert edit. Observe the difference in how the footage reacts to this versus the Overwrite.
If you’re not sure of the difference, hit Apple-Z and experiment until you fully understand how each type of edit works.
-- As you hold these clips over the timeline, take a look at the CANVAS window. No matter whether you’re doing an INSERT or and OVERWRITE edit, the CANVAS window will show you exactly what frames are going to be at either end of the clip you’re dropping in. Watch the canvas window as you drag this 2-second clip around over the “Emory” clip.
-- If at any point you make a mistake or want to back up. Hit the Apple+Z key to undo the last thing (or series of things) you’ve done or select “Edit -> Undo” from the main toolbar.
After playing with this, go ahead and do an INSERT edit on V2, so your clip is inserted into the middle of the Emory clip already on that track.
This is a basic way to do an assembly edit. You bring up your files into the VIEWER, trim them to about the length you’d like, drop them into the timeline, shift them around and edit your project together.
Let’s move on to working with some basic editing tools from the Tool Palette.
FORWARD TO PAGE 16 – “The Selection Tool”