ADDING CLIPS TO THE TIMELINE
 Before you add your clips, you’ll need to determine where exactly they’re going to go in the timeline. Take a look at the “track controls” area at the far left end of the timeline. You should see one track that is labeled “V1” and below it you should see tracks labeled “A1” through “A4”
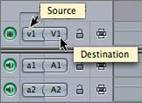
The “V1” is your video track and the “A” tracks are your audio. Next to V1, A1 and A2 you’ll see “Source indicators” These little pieces are snapped onto the tracks and indicate where the audio or video will go. The "source indicators" are labeled "v1", "a1" and "a2".
By default V1 track is linked to the A1 and A2 tracks, meaning that when the Video clip is dropped onto V1, the associated sound will be placed on audio tracks A1 and A2. Which Audio tracks are linked to which Video tracks can be changed by manipulating the “source indicators” and attaching them to different tracks but, for now, we’ll leave them as they are.
There are two audio tracks for each video track because one is for the right channel and the other track is for the left channel of a stereo sound track.
There are a number of ways to do move your clips into the TIMELINE. One very simply way is to grab the video in the Viewer with your mouse and drag it down onto the timeline.
-- Try this basic dragging method. Grab the “Rusty Titanic” clip right out of the “Viewer” window and drag it down to the timeline but don’t let go of your mouse button yet.
When you hold the clip over your timeline, you’ll see three gray bars stretching out, one of which is your video and the others that are your audio tracks. Using your mouse, move the video “bar” down and drop it so the video is on V1. Before releasing the mouse button slide the ‘bars’ all the way to the left so it starts at the very beginning of your timeline. The Audio tracks will automatically go to A1 and A2.
-- Release the mouse button. You have now added the 8-second segment of the “Rusty Titanic” video clip to your timeline. The yellow-triangular playhead on the timeline will automatically jump to the end of the clip, so grab the playhead and move it to the very beginning of the clip. Now, tap the spacebar and watch the 8-seconds of footage. When it’s done, click the link below to move on to the next page.
If you press the space bar (play) you should now see that 8-seconds of video play back in the CANVAS window, because you’ve added it to your sequence.
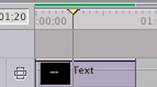
NOTE: As the clip plays, you should see the yellow-playhead [![]() ] move across the top of the Timeline window. This is exactly like the yellow playhead in your Viewer window. You can grab this playhead with your mouse and move it to any place along the timeline.
] move across the top of the Timeline window. This is exactly like the yellow playhead in your Viewer window. You can grab this playhead with your mouse and move it to any place along the timeline.
FORWARD TO PAGE 12 – “Overlapping Clips”