IN AND OUT POINTS
In and Out points are markers that can be added to your clips to indicate the beginning and ending of the portion you’d like to use.
Look again at the Browser window and the “In” and “Out” columns next to each clip.
By setting in and out points here, you could select which portion of the clip you want to use in your timeline. For Example: If you wanted to skip the first 12 seconds of a clip and only use the footage after that point, you can set the in point to 00:12:00 (the 12 second mark) and when you bring that clip into a sequence, it will start exactly at the 12-second point. The in and out points determine which portion of your clip will be added to the sequence.
NOTE: This does NOT erase any of your footage. Because FCP is a non-destructive editing system, it just keeps track of what parts you want to use. So if you change your mind later, you can still go back and change the IN point to the very beginning of the clip without losing anything.
In and out points can be set by directly changing the numbers in the browser window but are most frequently set in the Viewer (for clips) or in the Canvas or Timeline windows (for sequences). For now, just leave the In and Out columns in the Browser window alone.
MARKING IN AND OUT POINTS IN THE VIEWER
By setting “In” and “Out” points in the Viewer, you’re determining what section of this video clip will be added to the timeline. Nothing before the “In” point and nothing after the “Out” point will get added to your timeline.
REMINDER: your Browser is where all your raw clips are stored, the Viewer is where you view those clips, the Timeline is where all of your clips are edited together to form the sequence and all of that edited footage is shown in the Canvas window.
At the bottom LEFT corner of the Viewer window are the “Editing and Marking” controls, which are a set of 6 buttons. ![]()
You can mark the IN and OUT points for your clip by using the “mark in” ![]() and “mark out”
and “mark out” ![]() buttons which are the last 2 of the 6 buttons there.
buttons which are the last 2 of the 6 buttons there.
TIP1: The keyboard shortcut you can use instead of those buttons are the “I” key for setting the “In” point and the “O” key for setting the “Out” point.
TIP2: If you want to clear your marks, OPTION+I or OPTION+O will remove the In and Out marks, respectively. OPTION+X will remove both marks
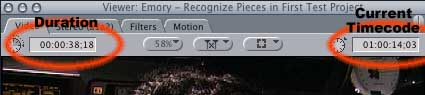
Up in the top right corner of the viewer you can see the “current timecode field” that tells you how far into the clip you are, and in the top left corner you will see the "duration field" showing the length of the entire clip (if there are no IN and OUT marks set) or the duration of the portion you’ve selected by setting the in and out marks.
NOTE: Timecode is represented in Hours, Minutes, Seconds, and Frames HH:MM:SS:FF
So, using these tools, mark an “In” point exactly 10-seconds into the “Rusty Titanic” clip and mark the “Out” point so the duration is exactly 8 seconds long.
You should now have an “In” point at the 10-second mark, and “Out” point at the 17-second and 29-frame mark, which leaves you with an 8-second section of the clip selected.
On the next page, you’ll learn different ways to add this marked section of the clip to your Timeline.
FORWARD TO PAGE 11 – “Adding Clips to the Timeline”