CINE 219 Final Cut Pro Tutorial - Part 1
If you follow this tutorial, step-by-step, you will be editing with Final Cut Pro by the time you get to the end.
There are three things to note before you get started:
-1- You will be jumping back and forth between this tutorial and Final Cut Pro itself. The easiest way to do this on a single-monitor system is through the keystroke “Apple+Tab” (aka “CMD+Tab” aka "Command+Tab" aka "![]() +Tab") which means you hold down the “command” key and press the “Tab” key simultaneously. This opens the switcher and as you continue to hit that keystroke, it will cycle through all the running programs. Use this to move quckly back-and-forth from this web browser to Final Cut Pro.
+Tab") which means you hold down the “command” key and press the “Tab” key simultaneously. This opens the switcher and as you continue to hit that keystroke, it will cycle through all the running programs. Use this to move quckly back-and-forth from this web browser to Final Cut Pro.
-2- Many times throughout this tutorial, you will be instructed to find specific Final Cut Pro menus and options. You will need to ensure that the Final Cut Pro application is"active" in order to see the proper menus at the top of your screen. If you've just been clicking on Firefox or Safari, the menus at the top might be for Firefox and not Final Cut Pro. If you're not sure, all you need to do is to click on any of the Final Cut Pro windows to make them "active" and dsiplay the proper menus at the top of the screen.
-3- Keep in mind that almost everything you do on the computers can be UN-done. The most important keyboard shortcut for you to learn on the Mac is the “Undo” function. If you are ever doing something in Final Cut Pro and you feel like you’ve made a big mistake, simply “Undo” it and try again.
The “Undo” function in Final Cut Pro is found under the “File” menu, but is most commonly known as “Apple+Z” or “CMD+Z” or "![]() +Z" (which means you hold down the “apple/command” key and press the “Z” key simultaneously)
+Z" (which means you hold down the “apple/command” key and press the “Z” key simultaneously)
--- Okay, start FCP by clicking the icon on the dock that looks like a black and white clapper-board with red timecode numbers on it 
(If you hover over the icon, it will say “Final Cut Pro").
Final Cut Pro should start up.
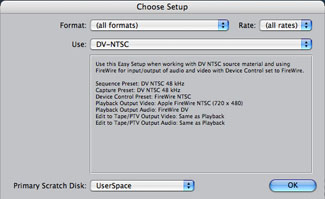
--- If this is the first time you’re starting up FCP on this particular computer , you will probably get an “Choose Setup” window asking you to choose your setup. For this tutorial, it should be set up for “DV-NTSC” and the window should indicate at the bottom that the “Primary Scratch Disk” is set to “UserSpace”.
If they Primary Scratch Disk is something else (NOT "UserSpace"), let me know before you click "OK".
NOTE: Because the setup in the MiX lab has recently changed, you may not see EITHER of the following two windows. That is fine. Just be aware of what they are in case you see them in the future.
If these are both set correctly then you’re fine. Click "OK"
Now you should see a window that says “External A/V Unable to locate the following external devices Apple Firewire NTSC (720x480)….”
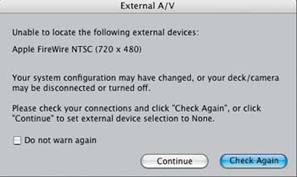
When you see this, it means that you haven’t turned on the HDV deck or it’s not connected. If you were going to capture video, this would be a problem, but if you’re not, then just click “continue”. Right now you’re not going to be capturing any video and your Sony HDV deck should be turned off, so just click "Continue"
You should now see the FCP windows open. These are the same windows you see on the handout.
FORWARD TO PAGE 2 – “Final Cut Pro Setup ”