DVD AUTHORING (DVD-Video)
NOTE: You have been shooting in HDV which is a High Definition format. A regular (non-Blu Ray) DVD is Standard Definition with a lower resolution than your HD footage. Therefore, you may find the appearance of the resulting footage to be less than optimal.
This tutorial will show you how to make a standard definition DVD. This process begins with the conversion of your HDV footage into a specific standard defintion format which can then be authored onto a DVD for playback. For Film #3, you only need to turn in the converted files, you do NOT have to burn a DVD-Video disc which will play in a standalone DVD player.
HOW TO CREATE A DVD FROM YOUR VIDEO PROJECT
To make a DVD which will play back your video projects in a standard DVD player, you have to convert the files to be compliant with NTSC DVD standards.
The process laid out below utilizes multiple pieces of software. While it may appear confusing at first, once you have gone through it you will find that it is not that complicated.
The process will be:
(1) Exporting your video from Final Cut Pro
(2) Converting the video (and audio) files to DVD compliant mpeg2 and ac3 clips using Compressor
(3) Authoring (and burning) a DVD using DVD Studio Pro
While iDVD can create DVDs for you, it is not a comprehensive authoring solution and, for this class, you need to use Compressor to create your DVD files to turn in with your final project.
STEP ONE - EXPORTING FROM FINAL CUT PRO
-1- Once you have completed your editing, you should save your project and close any sequence windows that you aren't using.
-2- Make sure you have your final, completed timeline open and set "IN" and "OUT" points in the timeline. This is a basic step, but make SURE you put them in the right place and don't cut off part of your film or leave a ton of black silence at the end either.
-3- Once you've set your IN and OUT points, go to File > Export > QuickTime Movie (NOT "Using QuickTime Conversion")
NOTE: You MUST have your timeline selected/active before you do this.
If you have your Viewer selected/Active, then FCP will try to export
export whatever clip you have in there. Make sure you're exporting
the correct thing.
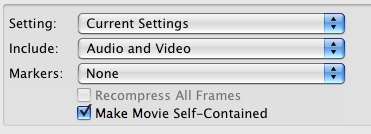
-4- Make sure the "Make Movie Self-Contained" checkbox is checked and the "Recompress All Frames" is NOT. What you are doing here is making a QuickTime Export. Note, this is one of the files you will want to upload and burn straight to a data DVD. However, you will also be using it to make your DVD-Video files as well.

-5- Give the file a name and save it someplace you can find it (like on the Desktop)
-6- Watch your file before moving on. Converting to the DVD format will take time and you want to make certain your video is correct.
Move on to the next step, converting your Final Cut Pro file to mpeg2 and ac3 using Compressor