PREPARING TO CAPTURE FOOTAGE
Previously you’ve imported your video clips from the hard drive. But when you’ve been out shooting video, you need to get those files from your tape and into you project via a different method called Capturing.
The Sony HDV decks you will be using to capture can not only be used for High Definition HDV footage but also for DV, therefore, it's important that they are set up properly before you try to capture your footage. Follow the following steps to ensure that you will be able to capture your footage successfully.
- Open the deck and turn it on by pressing and sliding the power switch. There are two things you need to check and possibly set on the deck. The first thing to check is to make sure that the deck is prepared to send and recieve video over the firewire and not via analog. The second thing to check is to make sure it's set for HDV and not DV.
CHECK THE AV OUT SETTING
- Press the menu button on the deck and using the up and down arrows, go to the "IN / OUT REC" menu.
- Press the right-arrow button to enter this menu.
- Use the down-arrow button to navigate to "A/V -> DV OUT"
- Once that is highlighted, you should be able to see if it says "ON" or "OFF"
- If it says "ON", press the right-arrow key and then the down-arrow key to turn it "OFF"
- You shouldn't have to change the i.Link Conv setting, but look at it and make sure that it is also set to "OFF". If someone has turned it on, change it.
- Press the left arrow key to exit that setting and then press the "menu" button to exit the menu.
MAKE SURE THE DECK IS SET FOR HDV
- Press the menu button on the deck. Using the up and down arrow buttons, highlight the “IN/OUT REC” menu. You are looking for “HDV/DV SEL”. When you see the “IN/OUT REC” menu, press the right-arrow button and navigate to the “HDV/DV SEL” option. You want this to be set for “HDV”. You do NOT want to use the “DV” or “AUTO” settings. Set it for “HDV” and then press the menu button to exit.
NOTE: If you had to change the setting from “DV” or from “AUTO”, you should shut down FCP. Then power down the deck. Then turn the deck back on and then restart FCP.
NOTE: You might get a warning that FCP is “Unable to locate the following external devices” IF the warning is that it cannot locate a DV device or “Firewire NTSC”, simply click “continue”.
If, on the other hand, you have set up the deck as instructed AND turned it on and you get a warning that it cannot locate an HDV device, there could be a problem. At this point, FCP should be seeing the deck as an HDV device. If, upon startup, it does NOT recognize the deck click “continue” and then close FCP.
Double check to make sure your deck is powered on, in HDV mode and is plugged into the firewire connection on the computer. If it is, try starting FCP again.
If you still get the error, close FCP and restart the computer. This should solve the problem.
- After FCP has started successfully, you need to make sure your settings are correct. You need to make sure your FCP project settings are set to capture 60i HDV.
|If you have a previously created project open already. Close it and create a new, empty project.
Delete the empty “Sequence 1” which FCP creates as soon as you start a new project.
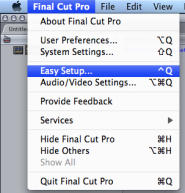
Then, go to the top menu bar: Final Cut Pro > Easy Setup
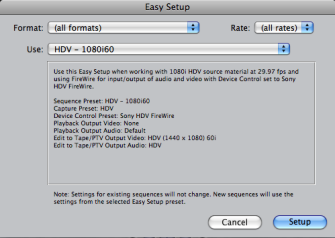
In the “easy setup” window, you want to select "HDV - 1080i60" from the "Use:" menu.
Take note of the "Format" and "Rate" menus as well. If you change the settings here, you will get fewer options under "Use:" For examply, if you select “HD” from the “Format” dropdown, you will ONLY get Easy Setup options for HD. If you choose NTSC, you will ONLY get SD options. If you're ever in this menu and cannot find the setting you are looking for, make sure you put these back to (all formats) and (all rates).
Once you have selected HDV 1080i60, click the “Setup” button.
- Go to: File > Save Project As… and save your project.
- Right click (or ctrl-click) in the “Browser” window and create a new sequence
NOTE: Once you've set these parameters, you SHOULD get a 1080i60 new project whenever you start up FCP and create a new one. HOWEVER, if you want to ENSURE that your project settings are correct, you should go through this process every time you create a new project.
If you want to make sure that your settings are correct, go to: Final Cut Pro > Audio/Video Settings.
The "Audio/Video Settings" window will open and the "summary" tab should look like this:
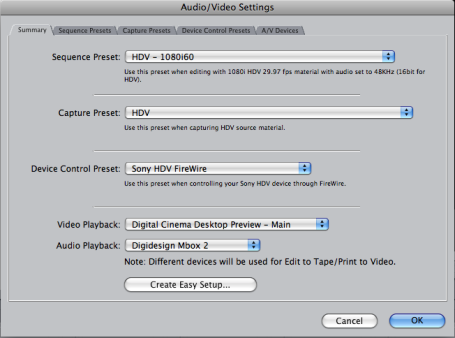
NOTE: The “Video Playback:” dropdown menu might be different depending on what computer you are on and it might say "None". Having it set to “Digital Cinema Desktop Preview – Main” will allow you to watch your sequence play back full screen when you press apple+F12. Also, the “Audio Playback” might say "Default". If you're able to hear your sound play out of the MBox2, then that is okay. If you cannot, you can change this to "Digidesign Mbox 2"
At the top, click on the “A/V Devices” tab. Your settings should look like this:
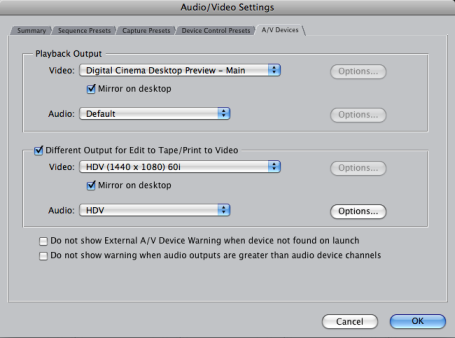
The important thing to note here is the bottom section which says "Different Output for Edit to Tape/Print to Video".
This bottom section allows you to have one set of output settings for editing while having a different set of settings for when you are going out to tape.
In the "General" tab you can see that the Audio is being routed to the MBox2 for editing. By having the Audio set for "HDV" at the bottom of the "A/V Settings" tab, Final Cut should automatically re-route your audio to the tape in the deck instead of out through the MBox2
FORWARD TO PAGE 4 – “Capturing HDV”