
CS 110 Lab Project 5
Secret Messages through Steganography
In this lab, you'll write a program that extracts one image that is "hidden" inside another. The hiding is done by understanding the underlying representation of color intensity values for the pixels in the image and taking advantage of the human eye's inability to differentiate low-level differences in color intensity. You'll then create the corresponding code to create/encode your own secret images.
Part I: Decoding an Image with a Hidden Secret
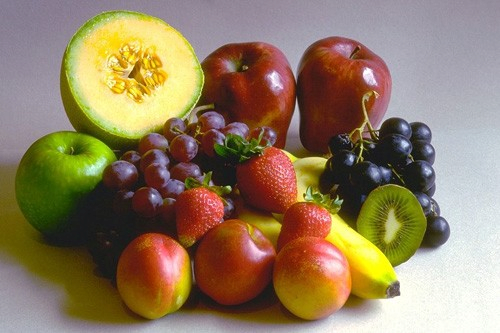
Consider the following image:
Clearly this is a picture of fruit... or is it? Look closely. See anything? Chances are nothing about this picture seems amiss. But things are not always as they seem...
Steganography is the science (or possibly art) of hiding one image within another. In this case, secret.png has a different, unrelated image hidden within it. The encoding used here is actually not all that complex. This image was created from the image fruit.png, although it is unlikely you'd be able to see a difference; the only change lies in the lowest order bit of each color channel.
What does that mean? Well, suppose one pixel in the original fruit.png image had a red intensity value of 13. In the binary representation used by computers, this number would be expressed as 00001101. (Note: I've written 8 binary digits; we've seen that color channels can go from 0 to 255 which is from 00000000 to 11111111 in binary.) Now this same pixel in secret.png is either going to be the original 00001101 (the last digit kept as a 1, for a decimal equivalent of 13) or 00001100 (the last digit switched to a 0, which has a decimal equivalent of 12). In other words, the pixel with a red value of 13 in fruit has either a red value of 13 or 12 in secret.
How did I choose whether to change the last bit to a 0 or not? I decided based on whether the corresponding pixel in the secret image I was hiding/encoding had a little red (0) or a lot of red (1) at that same (x,y) coordinate. Similarly for the green and blue channels. The end result was that I kept the overall look of fruit the same (any pixel changed by at most 1 in any given color channel) and yet I've encoded 3 bits of data per pixel. Let's decode it!
Create a program called Steganography.py.
Steganography.py should interact with the user to select the file secret.png (or in general, any file that has been previously encoded) and should then create a first Picture object; we will refer to this picture as the source. Also create a new blank Picture object the same size as the original; we will refer to this picture as hidden. This first couple of steps can draw from your experience in your piceditor, and so, if you want to display the Pictures created in this step, you will need to create one or more windows of the appropriate size.
Your task is to modify the pixels in (the initially blank) hidden picture based on the corresponding pixels in source. For each pixel, and for each color intensity (red, green, blue), we start by fetching the value from the pixel in source and determine, for each, whether it is even or odd. For a color channel of a pixel in source that is even, we want the same color channel at the corresponding pixel in hidden to be set to 0. For a color channel of a pixel in source that is odd, we want the same color channel at the corresponding pixel in hidden to be set to 255.
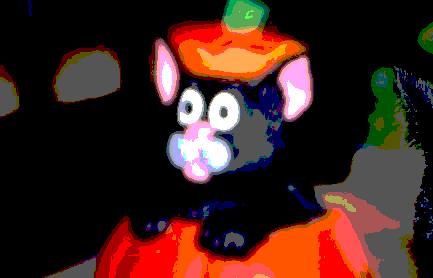
Now display this. If you see a recognizable image (that isn't fruit), congratulations! You've decoded your first secret image! Here is another picture with a hidden image that you can try: secret2.png
I will describe below some options for "packaging" this processing for the user.
Part II: Steganography Encoding
Now your goal is to enhance your program to perform the creation of secret images. When encoding, your program should obtain from the user and create Picture objects for two images of their choice. One will be the hidden image, and one will be the base image (like the bowl of fruit in the examples above). You should use conditionals to verify that the image to be hidden is smaller in both width and height than the base image. To encode, you'll start by creating a third new image, which we will refer to as result. Assuming the hidden image is smaller than base, (and result is the same size as base), we have two possibilities: a pixel that we want to "fill in" in result is within the bounds of the hidden picture, or it is not. If it is not, we simply want to copy the r, g, b intensities from a pixel in base to the corresponding pixel in result. Otherwise we have to perform the right encoding that will allow the decode from above to get back the approximation of the hidden picture.
To perform the encoding, we go through the same operations for all three color channels on each of the pixels that are in common to base and hidden. For a color channel of a pixel in base, we first need to "clear" the lower order bit. This means that every odd value must become the next lower even value. So if a color channel is odd, we just subtract one from it. Then we need to use information from the corresponding pixel and color channel in the hidden picture. If the value of the color channel from the pixel in the hidden picture is high (> 127, for instance) you'll want add one to the color channel value we are calculating, since making this value odd will result in a 255 color channel value during our decoding process. If the hidden picture's color channel for a pixel is low (<= 127) then we leave the calculated color channel value even.
After the encoding process is complete, your program should allow the user to save the resultant secret picture. Make sure the filename ends in '.png', because otherwise running the decoding process may not work. Test your encoding and decoding thoroughly both on the provided secret files and on files that you encode and decode for yourself.
Program Implementation Options
I am going to allow three different variants of this program. The first variation tries to remove the added complexity of a user interface with buttons and button functions and the like. One could envision separate Encode.py and Decode.py programs that simply go through the processing steps described above. While the programs would still need to invoke pickAFile() and perform appropriate checks for valid inputs and picture sizes, the rest of the interface could simply use print() function invocations and input() function invocations to accomplish any needed interaction with the user. Any display of a Picture could use a dedicated separate Window. Because of its relative simplicity, this implementation option will not be scored as highly, and the highest possible grade would be a B+. The program will be evaluated, as normal, for comments, functions, variables, and design structure in addition to the metric of correct operation.
The second variation would add in a "real" user interface. You are free to design this as you choose, but allowing the user to see all all the involved pictures in a single Window, and would use buttons to control the action, possibly also integrating the two parts into one and allowing the user to determine the desired processing of encode versus decode. I don't want to prescribe the exact look of the interface, and I leave that to your own creative decisions. This variant can achieve full credit for the assignment.
The last variant would be an extra-credit option, and would enhance the program further. The most obvious limitation of the program as it stands right now is that we are only using one "bit" of information in each color channel to represent the hidden picture. Like the posterize exercise from your piceditor, we could allow more information to allow a better representation of the hidden picture. We could allow a variation that uses the lowest two bits to hide an image. Using an extra bit should allow you to encode more colors (4 values per channel rather than just 2). As a result, once you've decoded the image, it should have a nicer range of colors (the previous program was only capable of encoding 8 different colors: black, white, red, green, blue, magenta, cyan and yellow). For those of you attempting this enhancement, I have hidden a picture inside beach-smaller, resulting in the following secret2bit.png. As a check, my decode yields the following result2bit.jpg.