 secret.ppm
 Due: Thursday, October 21st in class
In this lab, you'll write a program that extracts one image that is hidden inside another. You'll then create a second program to encode your own secret images. Because of Fall Break occuring on Monday, we'll keep this lab assignment to those two complimentary programs this week.
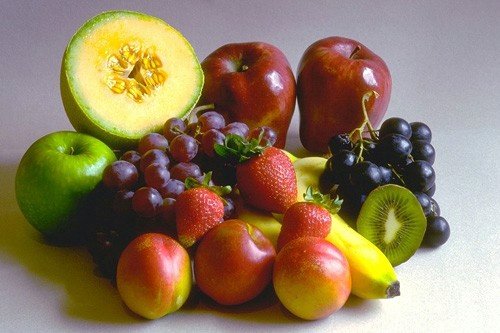
Consider the following image:
Clearly this is a picture of fruit... or is it? Look closely. See anything? Chances are nothing about this picture seems amiss. But things are not always as they seem...
Steganography is the science (or possibly art) of hiding one image within another. In this case, secret.ppm has a different, unrelated image hidden within it. The encoding used here is actually not all that complex. This image was created from the image fruit.ppm, although it is unlikely you'd be able to see a difference; the only change lies in the lowest order bit of each color channel.
What does that mean? Well, suppose one pixel in the original fruit.ppm image had a red value of 13. Recall that in binary this number would be expressed as 00001101. (Note: I've written 8 digits, since we've seen that color channels can go from 0 to 255 which is 11111111 in binary.) Now this same pixel in secret.ppm is either going to be 00001101 (the last digit kept as a 1) or 00001100 (the last digit switched to a 0). In other words, the pixel with a red value of 13 in fruit has either a red value of 13 or 12 in secret.
How did I choose whether to change the last bit to a 0 or not? I decided based on whether the corresponding pixel in the image I was encoding had a little red (0) or a lot of red (1). Similarly for the other color channels. The end result was that I kept the overall look of fruit the same (any pixel changed by at most 1 in any given color channel) and yet I've encoded 3 bits of data per pixel. Let's decode it!
Create a program called Decode.py.
Decode.py should read in the file secret.ppm (linked above and also in the course media folder) to create a first Picture object. Create a new Picture object based on secret.ppm in which you use the pixels from secret.ppm to zero out all but the lowest order bit in any color channel. That is, all odd color values from secret.ppm should be set to 1 in this new picrure, and all even color values from secret.ppm should be set to 0 in the new picture. For example, if one pixel is given by color values (143, 210, 51) then in the new image the same pixel should have color values (1, 0, 1). We've just extracted the lowest order bit. Display this image.
Not so impressive, right? It pretty much looks like a solid black image. Not so surprising, since no pixel has a brightness greater than 1 in any given channel. What we need to do now is brighten this up. We'll do that by multiplying all color values by 255. So 0, which was representing dark, will stay dark. But 1, which was representing bright, will become very bright. For example, the color of the pixel given above should now be (255, 0, 255).
Now display this. If you see a recognizable image (that isn't fruit), congratulations! You've decoded your first secret image!
Before you turn this in, make sure your program becomes user-friendly and asks the user for the filename to decode. That way we can try it on other images with embedded secrets -- such as the ones your Encode.py program in Part 2 will generate. The program should also offer the user the opportunity to save the decoded message image to a new file name. The files that you decode should always be in the .ppm file format. This format takes more space, but it saves every bit of the data, and does not perform any compression. If we let the compression algorithms from the jpg standard run against our images, it could lose some of the information we are capturing in the low order bits of our secret images.
Now your goal is to create the program that does the encoding. Make a new program called Encode.py. Encode.py should read in two images of your choice. One will be the message image, and one will be the base image. You should use conditionals to verify that the message image is smaller in both width and height than the base image. To encode, you'll start by creating a third new image and then want to first zero out the smallest bit in each color channel from the base image (i.e. decrease the value by 1 if it is odd). Then you'll want to set it to 0 or 1 depending on whether the corresponding color channel of that pixel was high or low in the message image. For example, if the red value of the pixel in the message image was greater than 127, add 1 to that pixel's red value in the base image. Otherwise, leave it unchanged. Once you've done this for every color channel and every pixel, write the image to a '.ppm' selected by the user. Make sure your encoding program works by using your decoding program on newsecret.ppm.
Bonus: Make Decode2.py and Encode2.py that use the lowest two bits to hide an image. Using an extra bit should allow you to encode more colors (4 values per channel rather than just 2). As a result, once you've decoded the image, it should have a nicer range of colors (the previous program was only capable of encoding 8 different colors: black, white, red, green, blue, magenta, cyan and yellow).
Your folder called Lab07 should contain: