
Due: Thursday, October 15th at class time
This lab will have you implement some string manipulations for some interesting applications. Please READ THE LAB CAREFULLY! You'll also be creating a few additional programs that manipulate images. For the various programs involving strings, you'll be using:
s[i]: return the element (character) at index i in the sequence (string) s.
You'll also be using the built-in function len:
len(s): return the length of the sequence (string) given by s.
For example, if s is a string referring to the value "monkey" then s[2] would give the value 'n'. The last character in a string is always given by s[len(s) - 1].
A palindrome is a string of characters that reads the same forwards as backwards. For example, "UFO Tofu", backwards, is "ufoT OFU." In other words, it's the same backwards, assuming you ignore spacing, punctuation and capitalization. Other well known palindromes include "A man, a plan, a canal, panama", "Evil, a sin, is alive", "Damn! I, Agassi, miss again! Mad!" and "Yo, bozo boy!" Alright, maybe not all of them are so well known.
As you now know, we can use Python to access any particular character in a given string. That is, I could ask Python for the character at index 2 in the string "monkey" and it would tell me it was 'n' (note it isn't 'o'... char 0 is the first char in the string, char 1 is the second, etc.) Lets say I have a string s and I know that its length is n. So the last character in s has an index of n-1. Write a program that looks at a particular string and determines whether or not it is a palindrome. That is, after running your program, a boolean variable that you've defined within your program called palindrome should be true if and only if the string s really is a palindrome. You may assume that all spacing and punctuation have already been removed, and that all letters are lowercase. So our first example would be input as the string "ufotofu". In such an example, after running your algorithm, the value of palindrome should be set to True. If the input was instead "salads" then palindrome should be set to False. The result should be printed out to the user.
Create a program called Palindrome.java. This should read in a string from the user and report whether or not it is a palindrome. For extra credit, allow the original string to include punctuation and to have mixed case and still operate correctly. You must use an explicit loop in your program to traverse the string character by character. ... so although built-in string operators are ok, the string methods are specifically disallowed.
As you all know very well, a semordnilap is a pair of words such that one backwards is the other forwards. You know, like "gateman" and "nametag". Or "diaper" and "repaid". Just in case some of you didn't know this word, it comes from palindrome spelled backwards. Now you know. Maybe you knew of these peculiar pairs by one of their many other names, including volvograms, mynoretehs or anadromes. No really, google it, I'm not making this stuff up.
Anyhoo, your task now is to write a program that determines whether a pair of strings s and t are semordnilaps. Again, you should have a boolean variable with a reasonable name that is set to true if the two strings have the desired property, and is false otherwise. Create a program called Semordnilaps.py. This should read in two strings from the user and report whether one forwards is the other backwards. Again, this must not use the string methods and must traverse the strings character by character.
Write a program named Pyramid.py that generates a pyramid of stars of height n. For example, if n = 5, the output should look like
*
***
*****
*******
*********
Note that you'll need to be printing spaces as well as stars so that things line up as they should. You must use nested loops to print the pyramid -- so you are not allowed to use string multiplication to compute each line. The program should read in an integer from the user and generate a pyramid as given above.
In order to be able to do interesting media manipulation with jpeg images, we need a library with more capabilities than the graphics module we have been using up to this point. Fortunately, there is a library known as the Python Imaging Library (PIL) that gives us the ability to bring existing jpeg images into our programs as well as to create new jpeg images of our own creation.
We begin by importing the Image class from the PIL module:
from PIL import Image
If we wish to create a blank image of a particular size, say 800 by 600, we could execute the following:
imagesize = (800, 600)
image1 = Image.new('RGB', imagesize)
This initialized a blank 800 x 600 image (or whatever dimensions you specified). One new thing you should note from the above: the imagesize variable is initialized to the tuple (800, 600). This is simply an easy way that Python provides to group together a small set of data items (like the width and height in this case) and to allow us to treat them as a single entity, and as shown here, to use a single name for them. The PIL module uses this technique for sizes, for (x, y) coordinates, and for (red, green, blue) color specifications. So the new function in this case only has two arguments, a mode specifying the kind of image ('RGB'), and a size, which is a tuple giving the width and height. The new function creates a new, blank, object instance of the given size.
Say, however, that we want to create an image that we can work with from an existing jpeg file located somewhere in our filesystem (i.e. in some folder on one of the disks we can access from the computer. We can accomplish that with code that looks like the following:
mediadir = '/Volumes/Shared Workspaces/BRESSOUD/CS110-01/Resources/media/'
image2 = Image.open(mediadir + 'octopus.jpg')
In this example, there is a folder whose pathname is given by the string assigned to mediadir. In that folder is a jpeg image in a file named octopus.jpg. We use the open function of the Image class to open the specified file (created just by concatenating the directory string with a string specifying the file). This function returns an object instance of an Image, just like the first example, but here the image is created from a disk file instead of being blank. Here we do not get to specify a size, because the size is already determined by the jpeg file. We can find out the size (which is a tuple) by breaking out the width and height of the size attribute of an Image, like so:
(width2, height2) = image2.size
When you have a tuple (like the image2.size attribute), you can break it into its constituent parts by assigning it as we do above, to a tuple with a variable for each part.
Objects of the Image class have methods (functions) for both retrieving the current color of a particular pixel, and for changing the color of a particular pixel. One can get the red, green, and blue intensities for a pixel with a single function invocation that returns an (r, g, b) tuple as follows:
pixelxy = (100, 150)
(r, g, b) = image2.getpixel(pixelxy)
Here, pixelxy, r, g, and b, are variable names of our own invention. We are invoking the getpixel method of the image2 object instance and specifying the (x, y) coordinate as the tuple given by pixelxy. The function returns a tuple with the red, green, and blue intensities (in the range 0 to 255), and these are being assigned to the variables r, g, and b, respectively. Note that we do not need to use the pixelxy variable. We could simply pass in a set of constants: image2.getpixel((100, 150)), or even a tuple constructed of the x and y coordinates: image2.getpixel((xval, yval)).
If we want to set the color of a particular pixel, we need to specify two arguments, a tuple representing the (x, y) coordinate, along with a tuple specifying the (r, g, b) value:
pixelxy = (100, 150)
redgreen = (255, 255, 0)
image2.putpixel(pixelxy, redgreen)
The following snippet of code would draw a horizontal line in a 256 by 100 image with increasing values of a grayscale color:
imagesize = (256, 100)
image1 = Image.new('RGB', imagesize)
for i in range(256):
grayrgb = (i, i, i)
xval = i
image1.putpixel((xval, 50), grayrgb)
image1.show()
Try the above and make sure you understand how it works. Experiment with the abilities shown and try coding the color fade from the last lab with this new library.
Using the PIL module and the Image class, we have shown that we can retrieve the color values (r, g, b) for any pixel in a given image, and that we can modify the color values for any pixel in a given image.
Create a program called NoRed.py that removes all red from the image. Your program should open an existing image from the shared workspaces media folder, and then should modify the image so that, for every pixel in the image, the modified image should have the same amount of green and blue in the image, but should have zero red intensity. Once the image has been modified, show the image.
If you look in the course shared directory under resources, you'll find a folder called media. This contains a number of images. The last part of this lab involve you creating programs that modify images in some predetermined way, similar to what you did in NoRed.py In this part, you'll be writing three programs. The first will invert the colors of an image. The second will desaturate an image. And the last will posterize an image. For example, if your initial image was something like
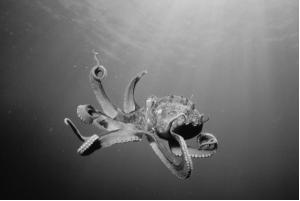
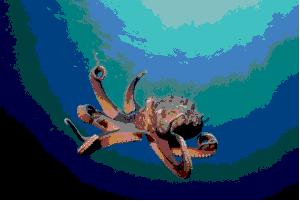
then the inverted, desaturated, and posterized versions will look respectively something like this:
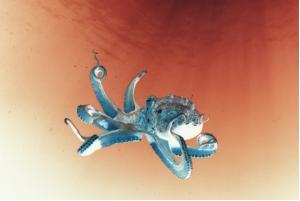
You can use whatever images you want from that folder, just pick something you like.
Write a program that inverts the color of each pixel in a given image and display the image to the screen. An inverted image has each channel of each pixel "inverted". That is, if the green value was 0, it is now 255. If the green value was 1, it is now 254, and so on.
Write a program that makes a greyscale version of an image. Recall that shades of grey are created by setting all three color channels equal. Of course, picking arbitrary shades of grey for each pixel won't produce much of anything. You'll want to set the grey value to match the average brightness of the pixels. For example, if the pixel had a color given by (50, 50, 200) then the greyscale version should be (100, 100, 100), since (50 + 50 + 200)/3 = 100.
Write a program to posterize an image. Posterizing is done by reducing the number of colors the image uses in a natural way. For example, currently the blue channel of any given pixel could have any integer value from 0 to 255. To posterize the image, we might simplify things by only allowing 3 values of blue: perhaps if the blue is between 0 and 100, we set it to 50, if between 101 and 200 we set it to 150, and if between 201 and 255 we set it to 250. If we were to do the same with red and green, then each color channel could only have 3 possible values, and thus the total number of possible colors would be 3 x 3 x 3 = 27. This is in stark contrast to the millions of colors that were originally possible. This creates a posterized effect (the way old posters looked when there were only a few colors that could be printed at any one time).
Play around with how many colors you allow of any particular channel, how you vary the ranges of colors, and how you pick what each range gets mapped to. Find something you like. The most natural way to set colors would be with if or if-else statements, although you could also use modular arithmetic if you're just planning on having regular intervals of color.
At this point your folder called Lab06 should contain: